Magikarp Crochet Switch Bag
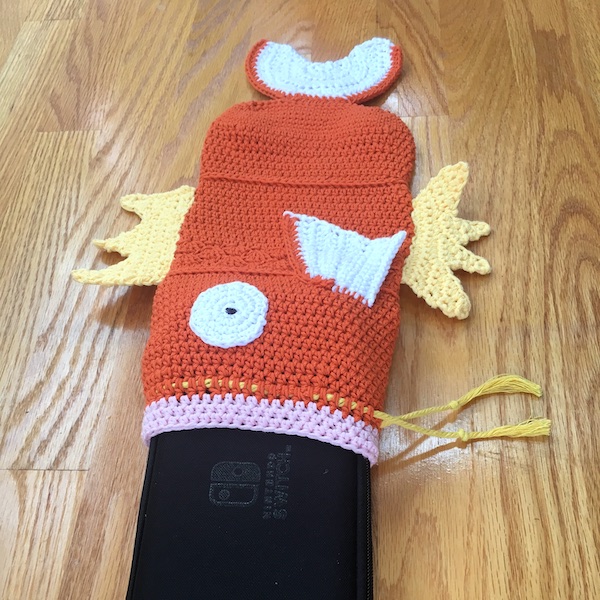
Magikarp uses splash! I wanted to crochet a Magikarp Switch bag as a Christmas gift, but didn’t find any patterns that had the right dimensions or details. So, I made one myself using a few different stitches to create the look I wanted! This drawstring bag won’t protect your Nintendo Switch, but it’s still a fun accessory for Pokémon-lovers.
Printable PDF Version
You can buy the formatted, printable PDF if you want to access it offline or print it out and mark it off as you go.
Buy the PDF on Ravelry for $3.00 »(You don't have to be a Ravelry member.)
Supplies
- Cotton worsted yarn (Suggested: Lion Brand 24/7 Cotton)
- Orange (~200 yards)
- White (~30 yards)
- Yellow (~15 yards)
- Pink (~10 yards)
- 3mm thick yellow cord (~1 yard)
- Black thread
- 3.75mm hook (F)
- Yarn needle for weaving in ends and sewing pieces together
- Sewing needle for embroidering the eyes
Abbreviations (US)
- ch - chain
- st/sts - stitch/stitches
- sl st - slip stitch
- SC - single crochet
- SCinc - single crochet increase (do 2 single crochets in one stitch)
- HDC - half double crochet
- HDCinc - half double crochet increase (do 2 half double crochets in one stitch)
- HDCdec - half double crochet decrease (half double crochet 2 stitches together)
- DC - double crochet
- DCinc - double crochet increase (do 2 double crochets in one stitch)
- DCdec - double crochet decrease (double crochet 2 stitches together)
- BPSC - back post single crochet
Gauge
- 4 sts and 3.5 rows = 1 inch in HDC
Notes
- This pattern switches between turned rows, joined rounds, and spiral/continuous rounds, but will indicate when you switch from one to another. When switching from joined rounds to spiral rounds, I’ve added the ch 1 to the end of the joined round.
- In spiral rounds, you may want to use a stitch marker to mark the beginning of each round.
- This comes out a bit loose around a basic Switch case. You can modify it to be larger or smaller, just make sure you end up with a multiple of 6 for the shell stitch rows. I’ve also included notes at the bottom on how to adjust it for a Switch Lite.
- Sequences to be repeated are written in [ ].
- Unless otherwise specified, chains are not considered a st and are not included in the st counts.
Instructions
BODY
- Start in turned rows. With orange yarn, ch 19.
- Row 1: Starting from the 2nd chain from the hook, SC in the back bump for each chain, turn. (18 sts)
- Row 2: Ch 1, SC in each st, turn.
- Row 3: Repeat row 2.
- Row 4: Ch 1, SC in each st. Do not turn!
- Continue counter-clockwise around the edge as if adding a border. The side facing you is the outside of the bag. Switching to spiral rounds…
- Rnd 5: [SC 4 along the short side, SCinc the first st of the long side, SC 16, SCinc the last st of the long side] repeat around. (48 sts)
- Rnd 6: [SC 4, SCinc, SC 18, SCinc] repeat around. (52 sts)
- Rnd 7: [SC 4, SCinc, SC 20, SCinc] repeat around. (56 sts)
- Rnd 8: [SC 4, SCinc, SC 22, SCinc] repeat around. (60 sts)
- Rnds 9-10: SC around: 2 rnds.
- Rnds 11-16: HDC around: 6 rnds.
- Rnd 17: HDC around until the last st. SC in last st, sl st to first HDC.
- This makes the whole round level so we can do a joined round…
- Rnd 18: Ch 1, BPSC around, sl st to first BPSC, ch 1.
- Switching back to spiral rounds…
- Rnds 19-27: HDC around: 9 rnds.
- Rnd 28: HDC around until the last st. SC in last st, sl st to first HDC.
- Switching to joined rounds for the rows of shell stitch…
- Rnd 29: Ch 1, [SC, skip 2 st, 5 DC in next st, skip 2 st] repeat around, sl st to first SC.
- Rnd 30: Ch 3, DCinc (partial shell), skip 2 st, SC, skip 2 st, [5 DC in next st, skip 2 st, SC, skip 2 st] repeat around, DCinc in same st as first DCinc (finishing the partial shell), sl st to top of ch3.
- Rnd 31: Repeat Rnd 29.
- Rnd 32: Ch 1, [DC, HDC, SC 3, HDC] repeat around, sl st to first DC. (This evens out the shell stitch rows.)
- Rnd 33: Ch 1, HDC around, sl st to first HDC.
- Rnd 34: Ch 1, BPSC around, sl st to first BPSC, ch 1.
- Switching back to spiral rounds…
- Rnds 35-45: HDC around: 11 rnds.
- Rnd 46: [HDCdec, HDC 8] repeat around. (54 sts)
- Rnd 47: [HDCdec, HDC 7] repeat around. (48 sts)
- Rnd 48: HDC around over the yellow cord, leaving 3-4 sts between cord openings at the bottom/underside of the Magikarp. Knot each end of the cord to prevent it from fraying or getting pulled inside.
- Rnd 49: HDC around. Change to pink yarn.
- Rnds 50-52: HDC around: 3 rows.
- Sl st to next st and fasten off. Weave in all ends.
TAIL
- Start with a magic ring in white yarn, but you will be working back and forth in turned rows rather than in rounds.
- Row 1: Magic ring, HDC 5, turn. (5 sts)
- Row 2: Ch 1, HDCinc in each st, turn. (10 sts)
- Row 3: Ch 1, [HDCinc, HDC] repeat to end of row, turn. (15 sts)
- Row 4: Ch 3, DCinc, HDC 2, HDCinc, SC 2, SCinc, SC 2, HDCinc, HDC 2, DCinc, DC, DCinc, turn. (21 sts)
- Row 5: Ch 3, skip first st, DC 2, HDCinc, HDC 2, HDCinc, SC 3, SCinc, SC 3, HDCinc, HDC 3, DCdec, DC, turn. (23 sts)
- Row 6: Ch 3, DC 3, HDCinc, HDC 2, SC 5, SCinc, SC 5, HDC 2, HDCinc, DC 3, turn. (26 sts)
- Row 7: Ch 3, DCinc 2, DC, HDC 6, DCinc, HDC 2, SC 2, HDC 2, DCinc, HDC 6, DC, DCinc 3. Switch to orange yarn, turn. (33 sts)
- Row 8: Ch 1, 3 HDC in first st, [HDC 4, HDCinc] twice, HDC 11, [HDCinc, HDC 4] twice, 3 HDC in last st. (41 sts)
- Fasten off, leaving a long tail for sewing.
PECTORAL FIN (SIDE) - make 2
- With white yarn, ch 13.
- Row 1: Starting from the 2nd chain from the hook, SC in the back bump for each chain, turn. (12 sts)
- Row 2: Ch 1, SC 11 (leave last st unworked), turn. (11 sts)
- Row 3: Ch 1, SC in each st, turn.
- Row 4: Ch 1, SC 4, HDC 4, DC 3, turn.
- Row 5: Ch 3, DCinc, DC 2, HDC 4, SC 3 (leave last st unworked), turn.
- Row 6: Ch 1, SC 4, HDC 4, DC 4 (work last DC into ch3), turn. (12 sts)
- Row 7: Ch 3, DCinc, DC 3, HDC 4, SC 3 (leave last st unworked), turn.
- Row 8: Ch 1, SC 4, HDC 4, DC 5 (work last DC into ch3). Change to orange yarn, turn. (13 sts)
- Row 9: Ch 1, HDCinc, HDC rest of row. Continue to HDC evenly down the side of the fin.
- Fasten off, leaving a long tail for sewing.
DORSAL FIN (TOP)
- With yellow yarn, ch 17. Leave a long tail for sewing.
- Row 1: Starting from the 2nd chain from the hook, SC in the back bump for each chain, turn. (16 sts)
- Row 2: Ch 1, SC in each st, turn.
- Row 3: Repeat Row 2.
- Starting the front peak…
- Row A4: Ch 1, SC 5, turn. (5 sts)
- Row A5: Ch 1, skip first st, SC 4, turn. (4 sts)
- Row A6: Ch 1, SC 3 (leave last st unworked), turn. (3 sts)
- Row A7: Ch 1, skip first st, SC 2, turn. (2 sts)
- Row A8: Ch 1, SC (leave last st unworked), turn. (1 st)
- Row A9: Ch 1, SC, turn.
- Row A10: Ch 1, SC, then continue to SC evenly down the side until you get to the bottom of the peak.
- Continuing to the back peak…
- Row B4/C4: SC across to the end, turn. (11 sts)
- Rows C5-C11: Repeat Rows A4-A10.
- Starting the middle peak…
- Row B5: SC 6, then SC into the last st of Row A10, turn. (7 sts)
- Row B6: Ch 1, skip first st, SC 6, turn. (6 sts)
- Row B7: Ch 1, skip first st, SC 5, turn. (5 sts)
- Row B8: Ch 1, skip first st, SC 4, turn. (4 sts)
- Row B9: Ch 1, skip first st, SC 3, turn. (3 sts)
- Row B10: Ch 1, skip first st, SC 2, turn. (2 sts)
- Row B11: Ch 1, skip first st, SC, turn. (1 st)
- Row B12: Ch 1, SC. (1 st)
- Fasten off.
VENTRAL FIN (BOTTOM)
- With yellow yarn, ch 16. Leave a long tail for sewing.
- Row 1: Starting from the 2nd chain from the hook, SC in the back bump for each chain, turn. (15 stitches)
- Row 2: Ch 1, SC in each st, turn.
- Starting front peak…
- Row A3: Ch 1, SCinc, SC 2, turn. (4 sts)
- Row A4: Ch 1, skip first st, SC 3, turn. (3 sts)
- Row A5: Ch 1, SCinc, SC (leave last st unworked), turn. (3 sts)
- Row A6: Ch 1, skip first st, SC 2, turn. (2 sts)
- Row A7: Ch 1, SCinc (leave last st unworked), turn. (2 sts)
- Row A8: Ch 1, skip first st, SC, turn. (1 st)
- Row A9: Ch 1, SC, then continue to SC evenly down the side until you get to the bottom of the peak.
- Starting next peak…
- Row B3: SC 4, turn. (4 sts)
- Row B4: Ch 1, skip first st, SC 3, then SC into the last st of Row A9, turn. (4 sts)
- Row B5: Ch 1, SC 3 (leave last st unworked), turn. (3 sts)
- Row B6: Ch 1, skip first st, SC 2, turn. (2 st)
- Row B7: Ch 1, SC (leave last st unworked), turn. (1 st)
- Row B8: Ch 1, SC, turn.
- Row B9: Ch 1, SC, then continue to SC evenly down the side until you get to the bottom of the peak.
- Then the next peak…
- Rows C3-C9: Repeat Rows B3-B9.
- Finally the back peak…
- Row D3: SC across to the end, turn. (4 sts)
- Row D4: Ch 1, SC 4, then SC into the last st of Row C9, turn. (5 sts)
- Row D5: Ch 1, skip first st, SC 4, turn. (4 sts)
- Row D6: Ch 1, skip first st, SC 3, turn. (3 sts)
- Row D7: Ch 1, skip first st, SC 2, turn. (2 sts)
- Row D8: Ch 1, SC, turn. (1 st)
- Row D9: Ch 1, SC, turn.
- Row D10: Ch 1, SC, then continue to SC evenly down the side until you get to the bottom of the peak.
- Fasten off.
EYE - make 2
- Rnd 1: Magic ring, SC 6. (6 sts)
- Rnd 2: SCinc around. (12 sts)
- Rnd 3: [SCinc, SC 1] repeat around. (18 sts)
- Rnd 4: [SCinc, SC 2] repeat around. (24 sts)
- Sl st to next st and fasten off, leaving a tail for sewing.
- With black thread, embroider small black circle in the middle of each eye.
ASSEMBLY
Using a yarn needle, sew the pieces onto the body, then weave in any remaining ends.
- Eyes: Use a running stitch around the eyes.
- Tail: For the tail, weave the orange end along the outside until you get to the base, then use a whip stitch to sew the base of the tail to the center of the base of the body.
- Pectoral fins: Use a whip stitch along the short orange edge of the pectoral fins.
- Dorsal & ventral fins: Use a back stitch along the underside of the dorsal fin and top side of the ventral fin, i.e., where they each meet the body. This keeps the yellow yarn seam invisible.
Adjustments for the Switch Lite
These are adjustments for a smaller bag that fits closely around a basic Switch Lite case. These notes only indicate changes in the number of stitches or rows, so refer to the full instructions for details, or you can buy the printable PDF for the detailed version.
- Ch 15
- 1-2: SC: 2 turned rows (14)
- 3: SC around outside (36)
- 4: [SC 2, SCinc, SC 14, SCinc] repeat around (40)
- 5: [SC 2, SCinc, SC 16, SCinc] repeat around (44)
- 6: [SC 2, SCinc, SC 18, SCinc] repeat around (48)
- 7: SC
- 8-11: HDC: 4 rnds
- 12: BPSC
- 13-21: HDC: 9 rnds
- 22-24: Shell stitch: 3 rnds
- 25: [DC 1, HDC 1, SC 3, HDC 1] repeat around
- 26: HDC
- 27: BPSC
- 28-39: HDC: 12 rnds
- 40: [HDCdec, HDC 10] repeat around (44)
- 41: HDC over yellow cord
- 42: HDC
- 43-45: Pink yarn, HDC: 3 rnds
- Fasten off, weave in ends.